Nifi Jdbc Processor to Read and Update Phoenix
Apache NiFi is an open-source projection that was congenital for information flow automation and management betwixt unlike systems. Some of the key features of NiFi, in addition to data flow, are ease of apply with a drag-and-driblet UI and hands scalable to run a unmarried server or in a clustered way across many servers. Interesting trivia nearly Apache Nifi is that it actually has its roots in the NSA and was donated to the Apache Software Foundation in tardily 2014.
To get you started with Apache NiFi, nosotros will walk you lot through how to ingest Salesforce data into Hive tables with the help of Progress DataDirect JDBC drivers.
Prerequisites
This tutorial assumes that you have Apache NiFi and a DataDirect JDBC driver. If yous do not have those items, please follow these quick steps:
Download Apache NiFi
- Download Apache NiFi from here.
- Extract the contents of the package to your desired location.
Install Progress DataDirect Salesforce JDBC driver
- Download DataDirect Salesforce JDBC driver from hither.
- To install the driver, execute the JAR package by running the following command in terminal or but past double clicking on the jar bundle:
coffee -jar PROGRESS_DATADIRECT_JDBC_SF_ALL.jar. - This will launch an interactive Java installer to install the Salesforce JDBC driver to your desired location as either a licensed or evaluation installation.
- Note that this volition install Salesforce JDBC commuter and other drivers for your trial purposes in the same folder.
Add together Drivers to the NiFi Classpath
- Go to the install location of Progress DataDirect drivers, which is normally at
/dwelling/<user>/Progress/DataDirect/Connect_for_JDBC_51. - Copy the Salesforce JDBC driver (
sforce.jar) and Hive JDBC driver (hive.jar) from the lib folder in the higher up location to/path/to/nifi/libfolder. - If yous have already started NiFi at this indicate, you will have to restart it to be able to use the drivers from NiFi.
Set Up the Salesforce JDBC Driver for the NiFi Flow
- Run the NiFi if you oasis't started it all the same. Y'all can do this by running
bin/nifi.shrun command on your last. Note that your password must be the root directory of NiFi when you run this command. - Open your browser and go to
http://localhost:8080/nifito access the NiFi UI, where you can create the flow. You should be seeing a canvass as shown below when the page loads. - To offset with edifice the flow, let's get-go with configuring the JDBC drivers start. On your sheet, in that location are two side bars, 1 says Navigate and another says Operate. Under the Operate open the settings for the process group named NiFi Menstruum every bit shown below.
- You should at present see a pop with ii tabs named Full general and Controller Services. Become to the Controller Services tab and click on the + button to add a new controller service.
- You should at present see a new popup displaying various Controller services you can cull from. Choose DBCPConnectionPool every bit your controller service and click on Add button equally shown below.
- Click on Edit button of the newly created controller service and y'all should at present meet a screen as shown below
- Fill in the details to connect to Salesforce as beneath.
- Go to Settings tab and rename the controller service if you want to. I inverse mine to SalesforceConnect and click on Apply push button to save the settings.
- Now it's time to enable this controller service. On the Controller Service, you should find an Enable button between edit and delete as shown beneath. Click on it to enable the service.
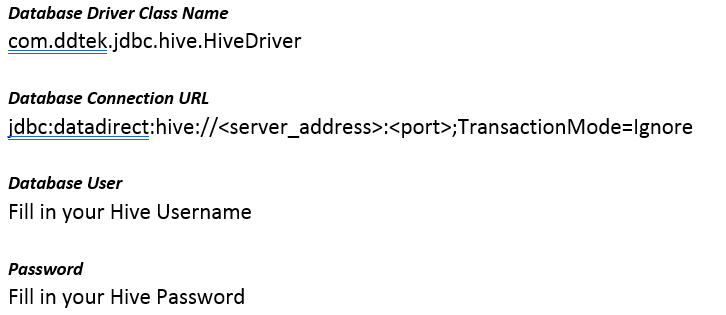
Set Up the Hive JDBC Driver for the NiFi Flow
Create another controller service for configuring the Hive connexion. Echo steps 4 through ix in a higher place, except in pace vii, substitute the details for the Hive driver as follows:
One time you accept both the Salesforce and Hive drivers configured, this is how the controllers will expect after they have been enabled:
 Shut the NiFi Menses Configuration popup and yous should now be dorsum on the canvas. Let's build the flow now that nosotros have everything in place.
Build the NiFi Menses
To build the NiFi Flow, first we would take to read the data from Salesforce and it can be done using a processor called QueryDatabaseTable, which supports incremental pulling of the data.
Drag a processor on to the sheet and cull QueryDatabaseTable and add it onto the canvas as shown below.
Right click on the QueryDatabaseTable processor and choose to Configure. Get to the tab Scheduling and choose the what kind of Scheduling strategy you would like to have and set the schedule when this flow should run.
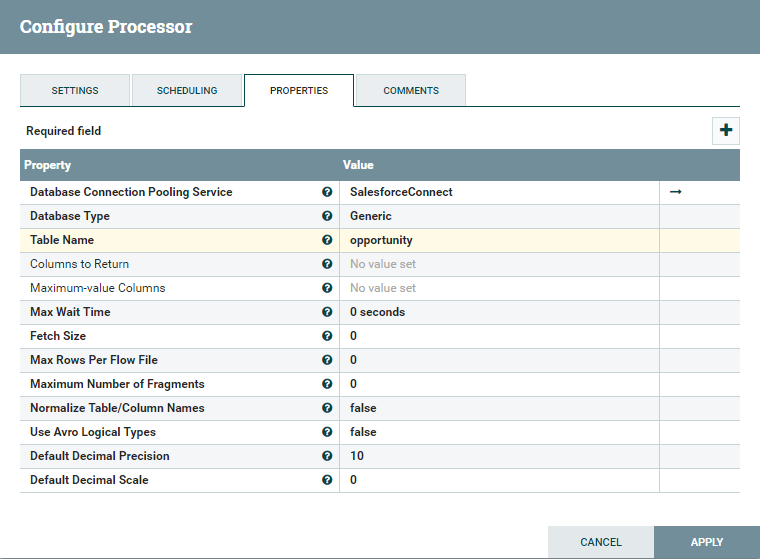
Go to Backdrop tab and under it configure it every bit follows:
- Database connection pooling service: Choose the controller service where you configured Salesforce Connection in previous steps. In my case, I chose the controller SalesforceConnect where I configured the connexion to Salesforce using the Progress DataDirect JDBC driver.
- Table proper noun: Cull the table that you would similar to ingest incrementally. I choose to sync the table Opportunity.
Below is a screenshot of the last settings for your reference:
Click on Use to save the processor configuration.
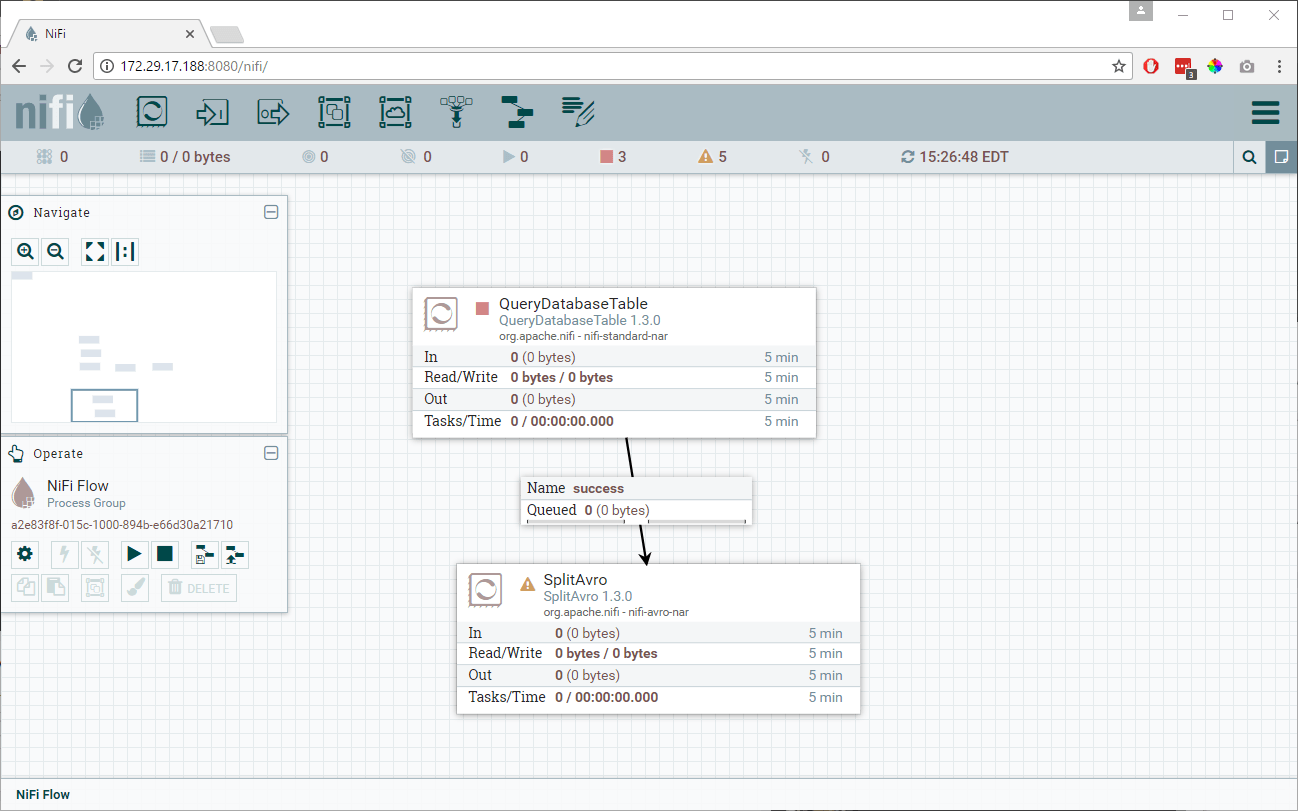
Drag another processor from the menu and choose SplitAvro as your processor from the list. This will carve up the avro binary output that comes out of the QueryDatabaseTable processor if it'southward too big.
Connect the processor QueryDatabaseTable to SplitAvro. As soon equally yous connect both the processors you volition encounter a configuration pop up for that connection show up. There is no configuration needed hither; just click on Add.
You should now take a flow as shown below. Discover that QueryDatabaseTable processor no longer has the alarm, which means it is properly configured. There are nonetheless alert signs on SplitAvro considering nosotros didn't yet configure it.
Right-click on the SplitAvro processor and choose Configure. On the settings tab, choose to automatically stop the relationships for failure in processor and for the original equally we don't need the original avro binary output as shown below. We will exist using the only separate relationship to go ahead.
These are the merely settings that you lot need to accept intendance of here. You can command how many records each divide information file can contain from the properties tab, but I wouldn't be going in to those today every bit I will exist using default values for this tutorial. You lot tin can click on Utilise and information technology will relieve the configuration for SplitAvro.
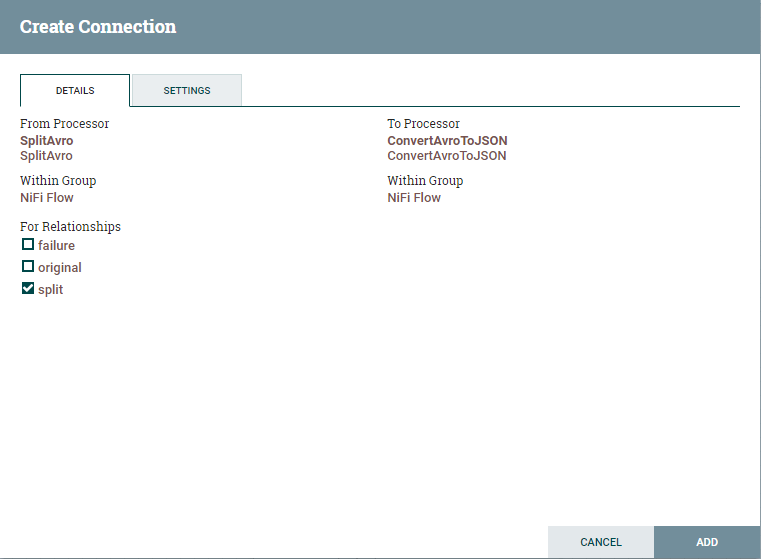
Drag another processor from the menu and cull ConvertAvrotoJSON to exist your processor. This processor volition convert all the avro records to JSON format.
Connect SplitAvro and ConvertAvrotoJSON processors and yous should now see the configuration for connection between these ii processors. Under for relationships, equally we simply demand the split, choose it and click on Add together as shown below.
Discover that all the warnings for the processor are cleared. You should now run into warnings just for the ConvertAvrotoJSON processor
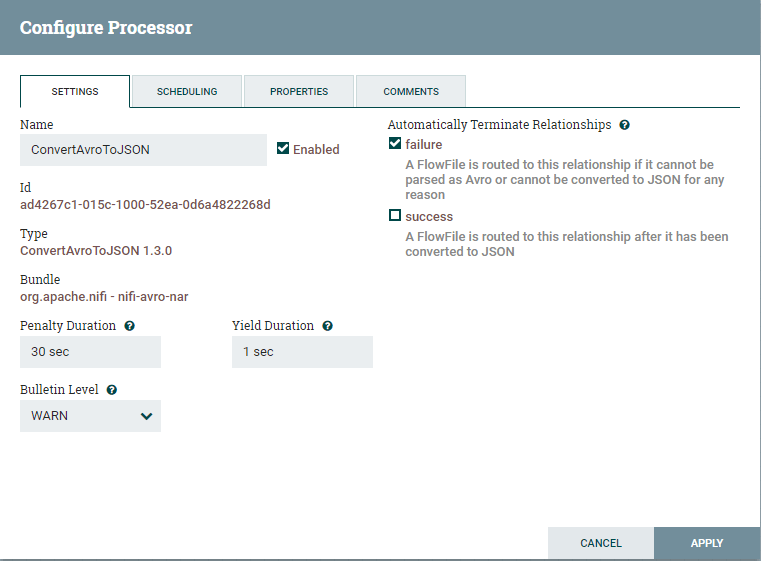
Right-click ConvertAvrotoJSON processor and choose Configure.
Under the Settings tab, cull to automatically stop relationships for failure as shown below. Click on Apply to save the configuration.
Drag some other processor from the carte du jour and choose ConvertJSONtoSQL processor. This processor volition help in creating Insert statements for the destination table.
Connect ConvertAvrotoJSON and ConvertJSONtoSQL processor and yous should see a popup for connection configuration. Enable the connectedness for the human relationship success and click on Add as shown below.
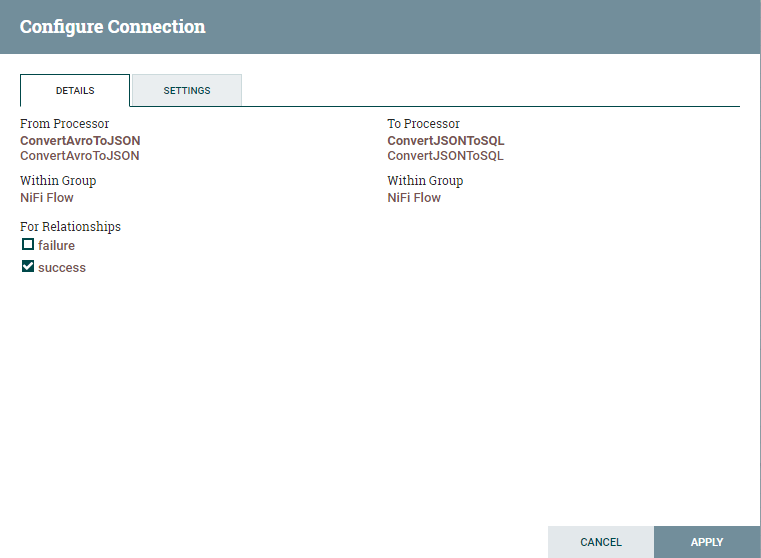
Observe that all the warnings for the processor ConvertAvrotoJSON are cleared. You lot should now meet warnings merely for the ConvertJSONtoSQL processor.
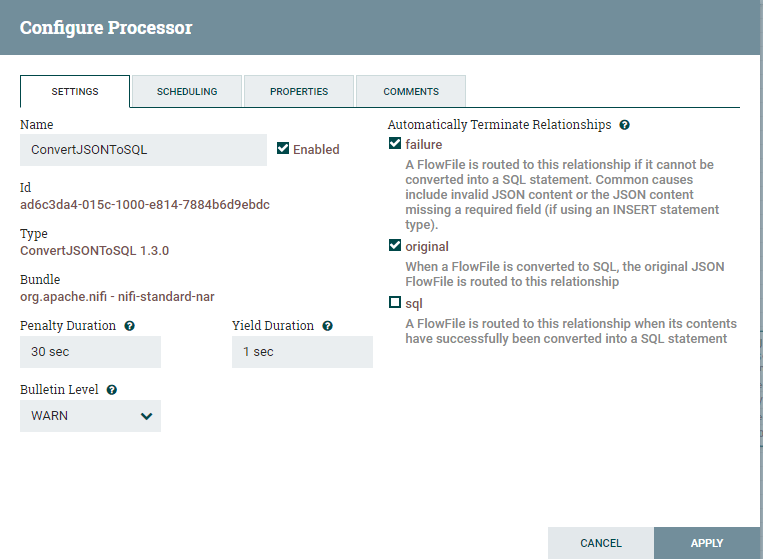
Configure the ConvertJSONtoSQL Processor
Before going alee, if you don't have anopportunity table with the same schema as Salesforce, you lot would have to create it first. I take tried to find if there was an automated style of achieving this, merely I couldn't find any. If you discover a style to practise this let me know in comments.
Right click on ConvertJSONtoSQL and choose to configure. On the Settings tab, choose to automatically terminate relationships on failure and original equally shown below.
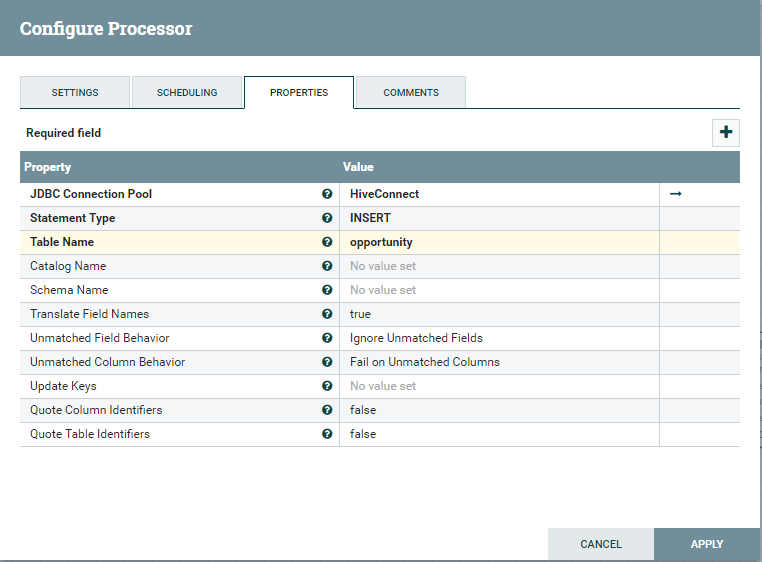
Go to the Properties tab and fill in the details every bit follows.
-
JDBC Connection Pool:Choose the controller service where you configured Hive Connection in previous steps. In my case, I chose the controller HiveConnect where I configured the connection to Hive using the Progress DataDirect JDBC driver.
-
Statement type:Insert.
-
Table proper noun:The table where you desire to insert the information in Hive.
The concluding processor that we demand is the PutSQL processor that puts the Insert statements created in the processor ConvertJSONtoSQL. Connect the ConvertJSONtoSQL processor to PutSQL processor.
Yous at present see the pop upwards for the connection configuration and configure it every bit shown below and click on Add.
Rightclick on thePutSQL processor and click Configure. Under the settings, automatically cease relationships for failure, retry, and success.
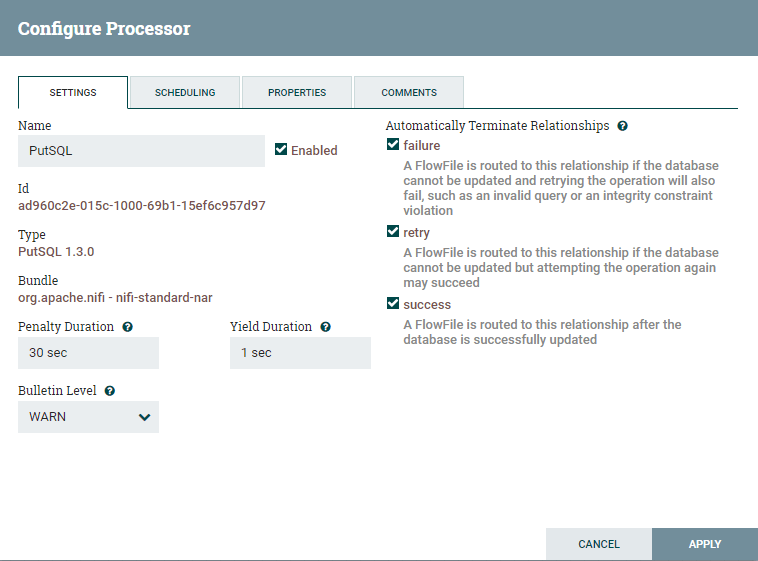
Under the Properties tab, configure the connection to Hive as follows. Hither, I am using the controller service that I accept created for Hive in previous steps.
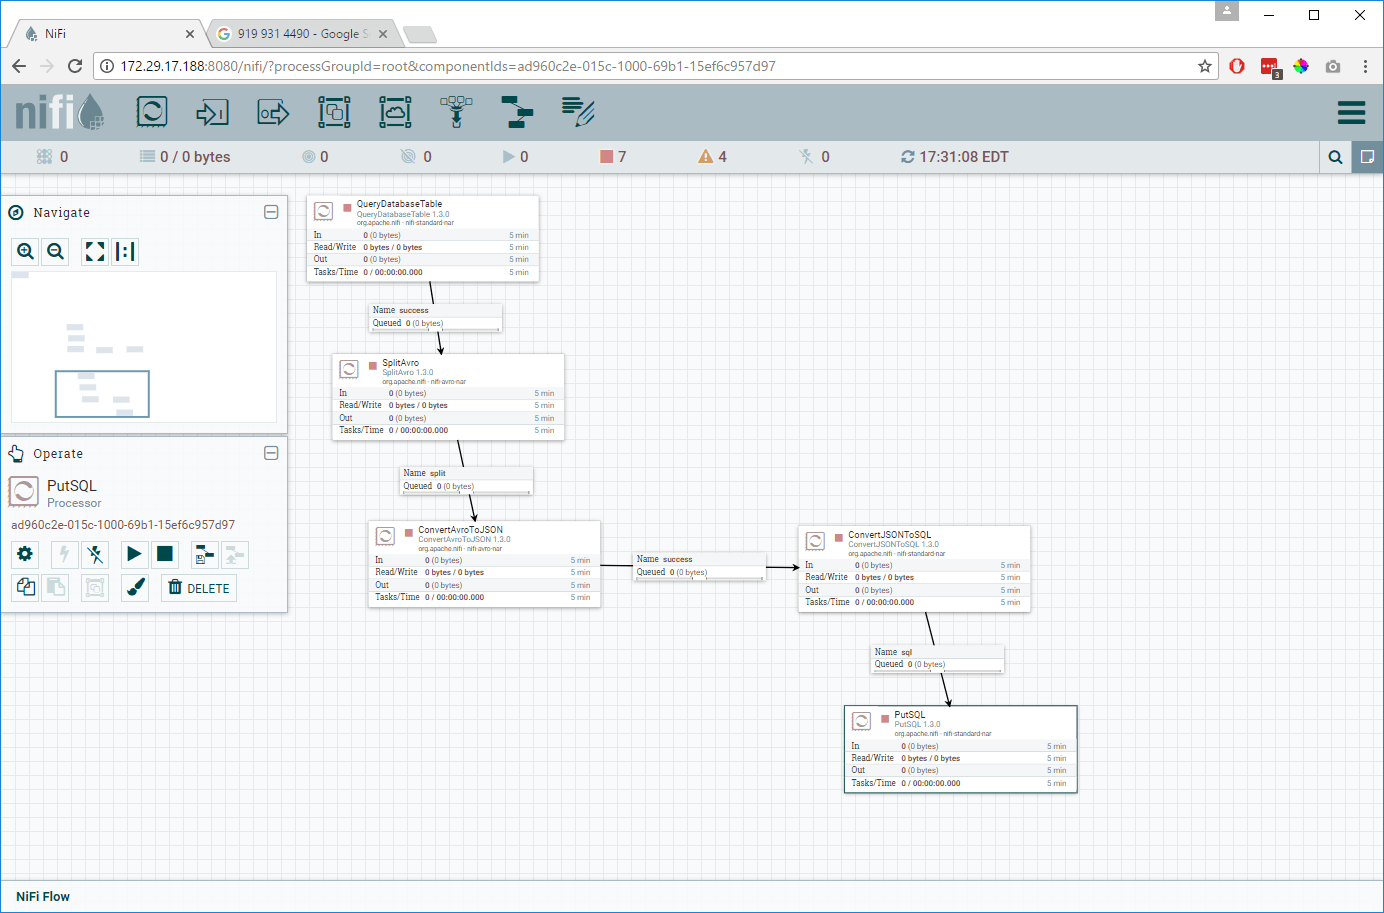
Click Apply to save the configuration. Your catamenia should be looking as shown below and you should see no warnings for any of the processors.
Run the Flow
To kickoff the menstruum, starting with the QueryDatabaseTable, right-click every processor and start them. One time the processors are started, you can see the data catamenia from Salesforce to Hive. One time the PutSQL processor has completed the process, you should now be able to notice the information in your Hive instance.
If you have scheduled the QueryDatabaseTable to run after X seconds, then after X seconds, the flow will fetch incremental information pull from Salesforce and ingest it into Hive automatically.
We hope this tutorial has helped you to become started with Apache NiFi. Note that yous can use similar flows to ingest your Eloqua, Google Analytics, Sugar CRM, SQL Server, and Oracle data to Hive example using Progress DataDirect JDBC drivers.
Topics:
big data, tutorial, salesforce, hive, nifi
Nifi Jdbc Processor to Read and Update Phoenix
Source: https://dzone.com/articles/access-data-via-jdbc-with-apache-nifi