My Bike Starts but Wont Start Again
Nosotros've all been there. You lot go to bed thinking everything is OK with the world then wake up the next morning and your motorcycle won't start.
We've fabricated a list of a couple of things you should check before you give in to despair.
If y'all've already diagnosed the problem you might want to try jump-starting your motorcycle, a portable jump starter volition come in handy for this.
Starting vs Turning Over
A mechanic volition typically draw your bike'southward issue as "non cranking/turning over" or "non starting".
This is important – if the starter motor sounds like it's turning over, as usual, your issue is probably the battery.
If the engine cranks but doesn't start, it could be having trouble producing a spark, getting fuel, or creating compression.
First Step – Check the Obvious Stuff
Without wanting to patronise, the simple things should exist checked first. Even the most experienced rider can have a encephalon freeze and miss the obvious…
- Check the killswitch
- Petrol tank – is there any fuel in the tank, is at that place a fuel valve that needs opening?
- Neutral gear and clutch – many bikes won't get-go unless they are in neutral and the clutch is held in
- Kickstand – is the kickstand safely stowed?
- Whatsoever obvious loose or frayed wires?
Second Pace – Bombardment Diagnosis
Visually audit the battery first. Bulges, cracks, leaks, discolouration, or a broken terminal can all exist diagnosed by looking. If it looks good, then it's time to check the battery in more than depth.
If you don't accept any tools to hand, the easiest (simply not the most accurate) style to see if your battery is OK is to either plow on your lights or sound the horn. Some bikes won't let y'all use the lights until the engine is running but the horn should work. If it sounds weak or changes tone or pitch, it's commonly a sign that the battery is dying.
The all-time way to accurately examination your bombardment is to use a multimeter. This is a useful tool around the house also. A decent, generic one can be had cheaply on Amazon.
- Admission the battery. Depending on your bike, this may involve removing faring or the seat. Some people use bombardment pigtails to make charging and testing easier. These are just extensions that you tin attach to the battery terminals to allow easier access for charging and testing.
- Set the multimeter to 20V DC (some advanced ones auto-detect), put the red diode on the positive terminal and then the black diode on the negative.
- Check the reading on your screen. Anything over 12.iv should get y'all started.
- If the reading is any lower than this, you won't exist going anywhere without a charge.
- If after a full charge, your bicycle doesn't read the total 12.6V – you lot may need to replace the bombardment.
Note: Make sure yous examination your battery after the bike has been sitting. Otherwise, you won't get an accurate reading.
Bank check out this article on the best motorcycle battery chargers.
Motorcycle wont start but battery is skillful?
If y'all've ruled out the bombardment movement onto these troubleshooting steps.
Third Step – Spark Plug Check
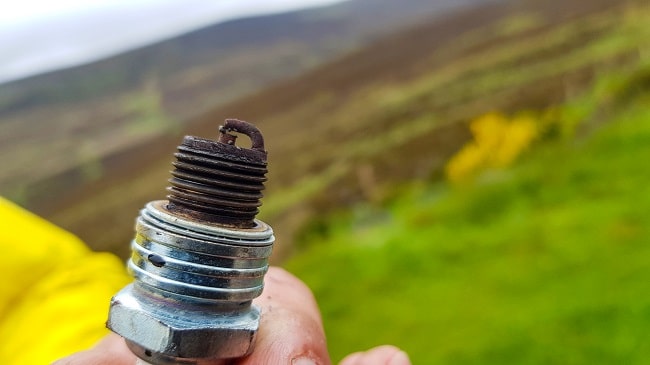
- The engine should cool before yous start this process. Put your bicycle on its side stand and remove whatever is necessary to admission the cylinder head and spark plug (seat, fairing etc,).
- Carefully pull the spark plug cable out and put it to one side. Using a spark plug socket and socket wrench remove the spark plug
- Check the ceramic part of the plug for cracks or deformity. Yous're also looking for blackened or melted electrodes and cracks in the insulation close to where the electrode protrudes. If you have a new plug handy, compare it to the condition of the one currently installed.
- If you can see whatever obvious damage to the insulation or the tip, supercede it with a new ane.
- If there's no obvious problem, pay attention to the colour of the insulation near the tip of the plug. Ideally, this will exist a very calorie-free brownish colour. If your plug is white and blistered, it indicates that something is making the plug run likewise hot. If it's night brown and wet, it indicates that the fuel system is running rich. Even if this plug is damaged, keep information technology so you tin can testify information technology to your mechanic later.
- If the colour is skilful, it's time to bank check the infinite in the plug. Using a feeler gauge, check that the gap between the electrodes at the spark plug'due south tip. The right gap will be indicated in the owner'south manual of your bike or easily establish online. When using the correct leafage on the feeler gauge, yous should feel a slight pull every bit y'all place the tool into the gap.
- If the leafage of the tool cannot be pulled through or pulls through without any resistance, adjust the gap with needle-olfactory organ pliers until you feel a gentle pull as you depict the tool through the gap.
- Put the plug back into its insulated cable cap. Belongings it by this cable, touch the electrodes lightly confronting the engine cylinder head. Watch the space betwixt the electrodes every bit you start the engine. You should see a spark betwixt the electrodes and cylinder head at this point. If yous're non getting any spark, information technology might be the ignition roll that'due south your problem.
Fourth Step – Fuel Valve
The fuel valve, or petcock valve, on older motorcycles, has an on, off, and reserve setting.
There were a few reasons for this, the most important beingness that gravity could keep to feed fuel to the carburettor (the tank is college than the carb), eventually flooding and causing problems.
When leaving bikes like these sitting, the valve needs to be put in the "off" setting for condom. Check this if yous're on an older bicycle. It's usually under the tank on the left side.
Fuel injection systems take made this obsolete, so your wheel may not take one.
Fifth Step – Blown Fuse
Bank check the main fuse on the motorbike, if it is blown, nothing electrical will work.
It'due south also possible to take a faulty fuse that works simply keeps your bike from running at 100%. This can be the cause of seemingly random cutouts and patchy periods of things not working properly.
Keeping a spare fuse with the bike is not a bad thought, every bit they are inexpensive and easy to swap out.
If the fuse keeps blowing, it'due south a clear sign that the electrical system is being overtaxed. This might be a result of too many accessories drawing ability or some faulty wiring that needs fixing.
Sixth Step – Footing Wires
This can yield similar problems to a sketchy fuse, with things working intermittently then failing.
Check your transmission to detect out where all the basis points are on your wheel and check if they're all connected correctly.
If yous've recently taken your bicycle apart, done some custom work, or resprayed the frame, it's not uncommon for ground points to get messed up. They demand to be a clean metal-on-metal connection to work correctly and exist condom.
Conclusion
Well, we've probably missed something. To be fair, the number of issues tends to increase with the age of the bike.
If you're new to riding, buying a bike that's both modern and adequately simple volition help yous acquire the nuts as yous go, and bank check out this article for some bones motorcycle maintenance pointers.
swanfeavainnince51.blogspot.com
Source: https://begin-motorcycling.co.uk/motorbike-wont-start/